
Yo, what’s good everyone? If you’ve been hanging out during my streams, you’ve probably seen those little dudes marching across the bottom of the screen — battling, dancing, blowing stuff up…
That’s Stream Avatars — and today, I’m gonna walk you through how to set it up for your own Twitch, YouTube, or Facebook Gaming stream. This setup guide breaks everything down so you can get it up and running, no stress.
Let’s go.
🔧 What You Need First
Before we get into it, here’s what you’ll need:
- OBS Studio or Streamlabs OBS (both work)
- Stream Avatars (Steam) – costs about $15
- Optional: Stream Avatars Extra Upload (for importing more avatars)
Once you’ve downloaded OBS and purchased Stream Avatars, we can get started.
🚀 Step 1: Launch & Connect Stream Avatars

- Open Stream Avatars
- Under Login Details choose your streaming platform (Twitch, YouTube, or Facebook Gaming)
- Authorize your account via the browser pop-up (OAuth)
- You’ll see a green check — that means you’re connected!
For Twitch, you can log in with both your main and bot accounts. If you’re just chillin’ solo, one account works fine.
⚙️ Step 2: General Settings
Click the General tab. This is where the magic starts:

- Responding to: Set to “Followers & Subs” to prevent randoms from spawning
- Spawn Behavior: Choose between “In Chat” or “Active Chatters” (With “In Chat” selected, viewers will spawn an avatar simply from watching your stream. With “Active Chatters” selected, viewers’ avatars will despawn after not chatting for a while.)
- Max Avatars On Screen: Limit how many avatars can be seen at once
- Auto Connect: Toggle on if you want Stream Avatars to launch with OBS
- Mouse Cursor: Toggle on or off if you want the cursor to be seen while you mouse over the Stream Avatars application
- Announcement Link: Displays a clickable URL in your stream so viewers can manage their avatar or view commands
- Target FPS / Canvas Size: Match this with your OBS setup (ex. 1920×1080 or 1080×1920 for vertical)
🛍️ Step 3: Downloading Avatars from Steam Workshop
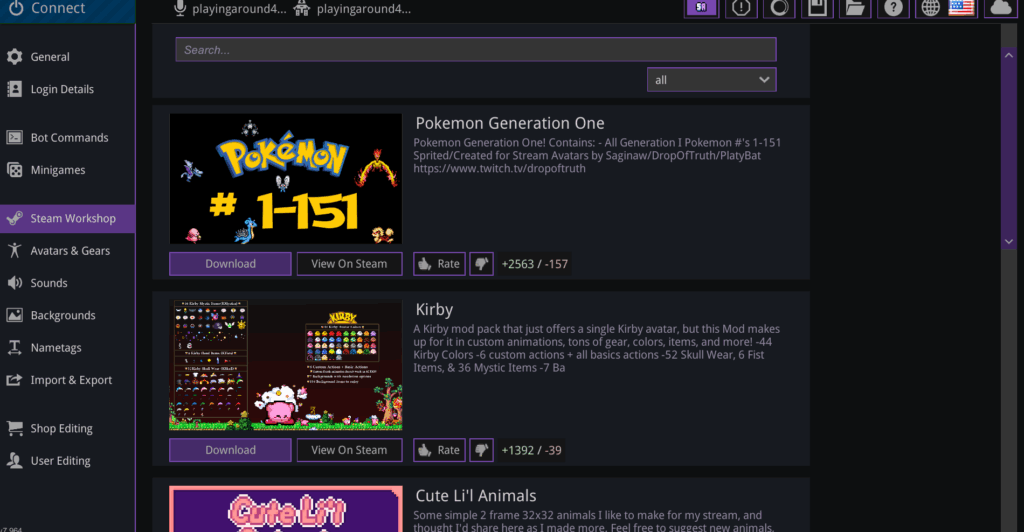
- Click Steam Workshop
- Browse avatars and hit Download
- Wait for it to finish and confirm success
- Click Connect to go back to your live scene
- Click the gift icon. You can now change your block man to a different avatar by clicking the drop down menu next to the “avatar” selection
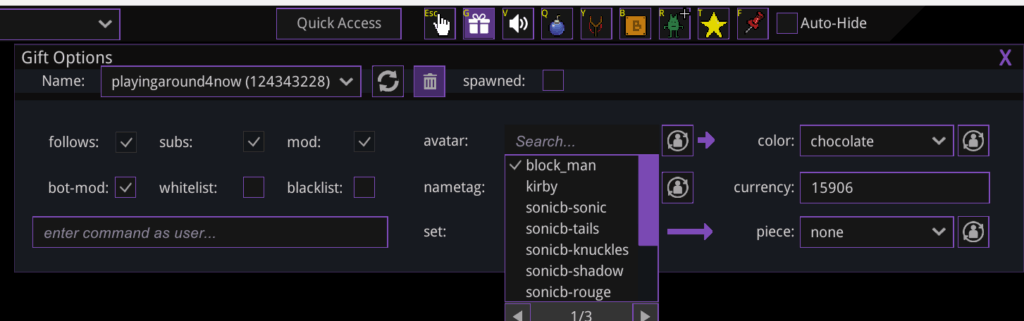
🎨 Step 4: Customize the Look & Feel
You can change backgrounds, resize avatars, edit name tags, and more:
- Quick Access Panel:
- Adjust avatar size
- Control name stacking
- Resize chat bubbles above avatars
- Icons Toolbar (top-right of the app):
- ✋ Grab and toss avatars
- 🎁 Give and edit gold or items
- 🔈 Mute the app
- 💣 Drop bombs (mass chaos)
- 🏹 Slingshot avatars across screen
- 🧱 Place blocks
- 👾 Spawn NPCs
- ⭐ Generate stars for gold-collecting minigames
- 📌 Pin avatars in place
🎥 Step 5: Add Stream Avatars to OBS
Here’s how to bring the avatars into your actual stream:
- Open OBS Studio
- Click the + under Sources → select Game Capture
- Name it something like “Stream Avatars”
- Choose Game Capture → pick the Stream Avatars app
- IMPORTANT: Enable Allow Transparency
- Click OK
If the avatar window doesn’t fit right:
- Go back to Stream Avatars → General tab
- Match canvas size to your OBS scene (1920 x 1080)
- Click Connect again
- Now it should scale properly
💬 Step 6: Try Some Viewer Commands!
In your chat, viewers can now use commands like:
!fart→ viewer’s avatar passes gas!bomb→ viewer drops a bomb!slots→ gamble on a mini slot machine!attack [username]→ viewer attacks another avatar on screen
Winners earn gold, which they can use to buy custom avatars, accessories, and more!
🧩 Step 7: Add the Twitch Panel Extension (Optional)
To give viewers an easier way to customize avatars:
- Go to your Twitch Creator Dashboard
- Click Extensions
- Search Stream Avatars
- Install & activate as a panel
- Viewers will now see a panel below your stream with customization options
They can:

- Pick an avatar
- Change colors
- Equip accessories (if you’ve enabled them)
- Spend gold they’ve earned from watching or winning battles
🛠️ Advanced Customization (Optional, But Awesome)
- Custom Name Tags for subs/followers/mods
- Avatar Editor to tweak size, movement speed, palettes, gear, etc.
- Shop Editor to set avatar pricing (ex: base avatars = 0 gold, premium = 500 gold)
- Sound FX: Let viewers spend gold to trigger sounds
- Boss Battles: Use
!bossto summon an enemy viewers can defeat together
You can even import your own avatar sprites, backgrounds, airplane graphics, victory sounds — everything’s fair game!
🔁 Resetting & Managing Data
From the User Editor tab, you can:
- Set default spawn avatars for followers
- Create special name tags for different viewer types
- Clear gold, reset battle results, or wipe everything if needed
- Blacklist common chat bots so they don’t spawn avatars
🎉 Final Thoughts
Stream Avatars is a crazy fun way to turn your stream into an interactive experience your viewers will love. From battle royales to custom gear, it adds a whole new layer of chaos, fun, and community energy.
I use it every stream, and it’s hands-down one of the best additions to my channel.
If you’ve got questions or want help customizing it for your own community, hit me up on Discord or catch me live on Twitch.
📘 More Tutorials:
👍🏽 How Set Up Channel Points with Stream Avatars
☝🏽 33 Essential Stream Avatars Commands
🛠️ Download Stream Avatars:
🎮 Buy it on Steam
Until next time — stay playful, stay powered up.
🕹️💬 – GGCheezus, PlayingAround4Now